Do you have a WordPress website and are looking for ways to increase your memory limit? If so, then this blog post is for you! We’ll be taking an in-depth look at how to increase the WordPress memory limit, step by step. From the basics of understanding what a memory limit is, to more advanced techniques like editing code, we’ll cover it all. So let’s get started!
Introduction
WordPress can sometimes be limited by its default allowed memory size. This means that some plugins or themes may not work effectively, as they need more memory to operate properly. Fortunately, increasing your WordPress memory limit is a relatively simple task that can be done in just a few steps.
In this guide, we’ll explain why you may need to increase your WordPress memory limit and how to do it quickly and easily. Let’s get started!
What is the WordPress Memory Limit?
The WordPress Memory Limit is the maximum amount of memory that a WordPress website can use in order to run properly. By default, the memory limit is set to 32 MB, however this can be increased depending on the requirements of your website. Increasing the memory limit will allow your website to handle more complex operations and tasks, such as uploading large images or installing new plugins.
It’s important to note that increasing the memory limit too much can put a strain on server memory and cause performance issues for your website. This means that you should only increase it if absolutely necessary and wisely.
The good new is that it’s very easy to adjust your WordPress Memory Limit and there are several ways to go about it. The most common method is by editing the wp-config.php file in the root folder of your website. You can also contact your hosting provider and request an increase from their end, or you can edit some PHP settings directly from within cPanel or Plesk control panel software.
Ultimately, each case will be different depending on what type of hosting platform you are using and what type of WordPress setup you have in place. But with a few simple steps, you should be able to easily adjust your WordPress Memory Limit quickly and easily so that your site runs smoothly!
Why You Might Need to Increase Your WordPress Memory Limit
Are you struggling with the WordPress Memory Limit? You’re not alone. Many WordPress users find themselves running into memory limit issues from time to time, especially when trying to manage a larger website or run multiple plugins at once.
The problem is that by default, WordPress has a maximum PHP memory limit of 32MB for single-site installations and 64MB for multisite installations. This limit can be too low for some websites, causing them to experience errors and slow performance.
Why You Might Need To Increase Your WordPress Memory Limit:
-If your website is running slower than usual
-If your website is experiencing errors or crashes
-If you’re running multiple plugins or themes
-If you’re managing a large website
How To Increase Your WordPress Memory Limit:
1. Edit wp-config.php file – You can manually edit the wp-config.php file located in the root directory of your site and add a line of code that will increase the amount of memory allocated for use by PHP on your server (e.g., ‘define( ‘WP_MEMORY_LIMIT’, ‘256M’ );’).
2. Contact Your Hosting Provider – If editing the wp-config file isn’t an option (e.g., if you’re using shared hosting), then contact your hosting provider and ask them if they
How to Increase WordPress Memory Limit Using wp-config.php
Do you ever encounter the “not enough memory” error when using WordPress? If so, you may need to increase your WordPress memory limit. It’s easy to do and can help you avoid a lot of issues with your website.
Luckily, there’s a simple solution: increasing the WordPress Memory Limit by editing the wp-config.php file. This is a PHP file that contains important settings for your WordPress website and it can be used to customize many of its features.
In this article, we’ll show you how to increase WordPress Memory Limit using wp-config.php in just a few easy steps. We’ll also provide some tips on what to do if the changes don’t work as expected. Let’s get started!
Step 1: Access Your wp-config.php File
First, you need to access your wp-config.php file via an FTP client or File Manager in cPanel (if you have hosting with us). Once connected, open the file and look for this line of code: define(‘WP_MEMORY_LIMIT’, ‘256M’);
Step 2: Increase Your WordPress Memory Limit
Once you find it, increase the value from 256M (which is 256 megabytes) to something higher like 512M or even 768M depending on your needs and available resources on your server (for example, if your hosting plan offers more RAM). Save the changes and upload the file back to its original location on your server.
Step 3: Check if Your Changes Worked
After uploading the updated version of wp-config.php back to
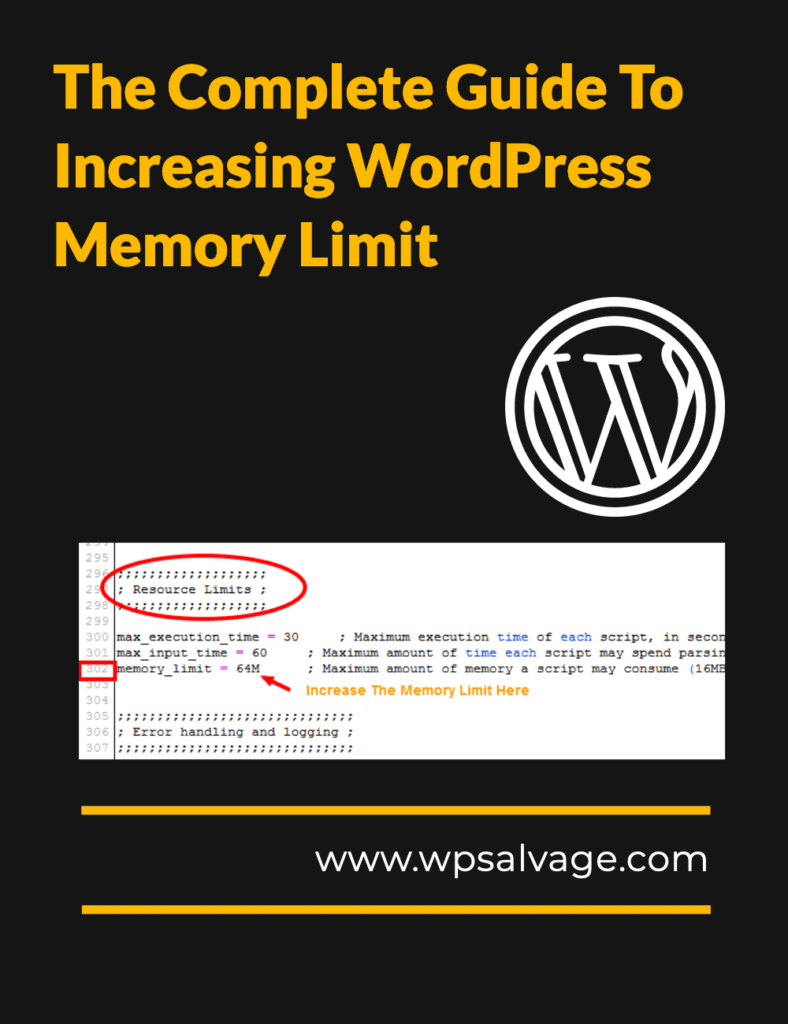
How to Increase Php Memory Limit In WordPress Using php.ini File
The WordPress memory limit is the maximum amount of memory that the server will allocate to a single process. If you are running low on memory, you may need to increase the WordPress Memory Limit. The most common way to do this is by editing your php.ini file. This guide will show you step-by-step how to increase WordPress Memory Limit using php.ini file.
First, you need to access your website’s server through an FTP client. Once logged in, locate and open the php.ini file in a text editor (for example, Notepad++).
Once opened, look for the memory_limit directive (you can use CTRL+F to find it). By default, this directive should be set at 128MB or 256MB depending on your web hosting provider – if it is lower than that, then you can increase it by increasing the number after “memory_limit” (for example: memory_limit = 512M). Save the changes in php.ini and close it when done.
The next step is to edit your wp-config.php file located in your root folder of WordPress installation directory – again using an FTP client or text editor like Notepad++ – and add/edit one line of code: define(‘WP_MEMORY_LIMIT’, ‘256M’); Make sure that WP_MEMORY_LIMIT value matches with what you have set in php.ini file (in our example both values would be set at 256MB). After saving wp-config changes close it as well and check if everything works as expected on your website or not before making any further changes!
How to Increase The Php Memory WordPress Memory Limit Using .htaccess File
As before, first you need to access your website’s server through an FTP client. Once logged in, locate and open the .htaccess file in a text editor like Notepad++ or Sublime Text. Once you have opened it up, add the following lines at the beginning:
php_value memory_limit 128M
php_value max_execution_time 180
php_value post_max_size 64M
php_value upload_max_filesize 64M
Once you have added these lines, save your changes and upload them back to your server (if necessary). This will now increase the WordPress memory limit from 32MB to 128MB. You may also want to adjust other settings such as post max size and upload max filesize if needed.
That’s all there is to it! By increasing your WordPress memory limit through the .htaccess file, you should hopefully have a smoother running website which won’t suffer from out-of-memory errors or slow loading speeds due to lack of resources.
How to Check Current PHP Maximum Memory Limit in WordPress
1. Edit wp-config.php
The first step is to find out where the current WordPress Memory Limit is set in your installation. To do this, open up the wp-config.php file located in the root folder of your WordPress installation and look for a line that reads “WP_MEMORY_LIMIT”. This will tell you what the current memory limit is set at and if there are any other settings that could affect it as well.
2. Check Site Health Tool (For WordPress 5.2 or Above)
If you are running WordPress 5.2 or above, then you can use the Site Health tool to easily check what the current PHP Memory Limit is on your site:
1) Log into your WordPress dashboard and go to ‘Tools » Site Health’ page in order to access this tool;
2) Once there, scroll down until you see a section labeled ‘PHP Memory Limit’; this will tell you what the maximum allowable amount of RAM that can be allocated for each individual process on your server;
Checking the PHP Version Used in Your Site’s Environment
Different websites have different hosting environments, and the version of PHP used can have a big impact on how your site functions. For this reason, it’s important to check the PHP version used in your site’s environment.
To check the PHP version that is being used by your site, you can use Drupal’s status page. This page will show you the current version of PHP and other information related to your hosting environment that may be useful in troubleshooting any potential issues with your website.
You can also check which version of PHP is installed on your server by logging into cPanel or using an FTP client to look at the php.ini file located in the root folder of your website. This file contains all of the settings related to how PHP runs on your server, including which version is installed.
It’s important to make sure you are running a compatible version of PHP for whatever applications or content management systems you are using on your website. Check with each application’s documentation for more information about what versions are supported.
If you need to upgrade or downgrade the version of PHP that is being used for one or more applications, there are several different methods available depending on how much access you have to configure settings on the web server itself:
– Editing .htaccess or wp-config files
– Setting with cPanel’s php configuration tool
– Upgrading/downgrading hosting plans
– Adding additional software packages via cPanel
Contacting Your Hosting Provider for Increasing the Wordpress Memory limit
If you’re experiencing out of memory errors on your WordPress website, you may need to increase the memory limit. Increasing your WordPress memory limit is an important step in keeping your site running smoothly and ensuring a great user experience. However, it’s not always easy to do this yourself.
In some cases, you may need assistance from your hosting provider to increase the WordPress memory limit. Here’s a step-by-step guide on how to contact your hosting provider and ask them to increase the WordPress memory limit for you:
1. Contact your hosting provider’s support team via phone or email. Make sure you explain clearly what the issue is and that you need help increasing the WordPress memory limit.
2. Provide them with any relevant information they may need, such as screenshots of error messages or log files that show the issue in more detail. This will help them understand what needs to be done better and faster and provide a more accurate solution.
3. Ask if there are any other solutions they can offer aside from increasing the WordPress memory limit (e.g., optimizing plugins or scripts).
4. If they agree to increase it for you, make sure that they provide clear instructions on how to do it correctly so that no further issues arise from it (e.g., making sure that all other settings are properly configured).
5. After confirming everything has been done correctly, test if the changes have worked by checking if there are still any errors getting displayed in Site Health Tool or by running some basic tests on your website (e.g., loading times).
Following these steps should help ensure that every process runs smoothly when increasing your WordPress memory
Troubleshooting Tips If Increasing Wordpress Memory Limits Does Not Work
If you’re having trouble increasing the WordPress memory limit, it might be time to troubleshoot. Here are some common tips and tricks that can help you resolve the issue:
1. Check for a Memory Limit in Your wp-config.php File – If your hosting provider has set a memory limit in your wp-config.php file, try adjusting it to the recommended 256M setting. However, if you don’t have access to this file or if it doesn’t exist, you should check with your hosting provider first before making any changes.
2. Increase PHP Memory Allocation – You can also increase the amount of memory allocated to your website from within cPanel or other hosting management systems by changing the PHP version and increasing its allocation of memory for WordPress sites.
3. Contact Your Hosting Provider – If all else fails and none of the above workarounds are successful, then contact your hosting provider for technical assistance as they may be able to help you resolve the issue more quickly than attempting to do it yourself.
4. Consider Changing Hosts – If all else fails and none of these solutions work, then consider changing hosts as there may be something wrong with their server configuration that is preventing you from increasing WordPress’s memory limit successfully.